Manage Docker with Kubernetes...
Introduction to docker container management with kubernetes
Let's say you have 2 or more computers in your network to host docker based software and you want to host your application(s) / site(s) on it.
You will go about installing a web-server, an application server and a database server docker images and configure them correctly. Then, you start the
docker images and hey presto, your application is up and running! Seems straightforward right?
However, what if :
- You want to scale your application based on number of users (running more than 1 instance)?
- One of the computer stops working and you want to deploy the failed component on another computer?
- You want to reconfigure your application?
- You want your application to integrate with other applications and services?
- You want to manage one or more of the above tasks in an easy / declarative / controlled fashion?
Enter Kubernetes
 Kubernetes is an full featured open-source orchestration engine for automating deployment, scaling and management of docker based applications.
It groups containers that make up an application into logical units for easy management and discovery.
Kubernetes builds upon 15 years of experience of running production workloads at Google, combined with
best-of-breed ideas and practices from the community. It's a sophisticated software that's revolutionizing the
way we deploy / scale / monitor these self-containing software packages.
Kubernetes is an full featured open-source orchestration engine for automating deployment, scaling and management of docker based applications.
It groups containers that make up an application into logical units for easy management and discovery.
Kubernetes builds upon 15 years of experience of running production workloads at Google, combined with
best-of-breed ideas and practices from the community. It's a sophisticated software that's revolutionizing the
way we deploy / scale / monitor these self-containing software packages.
Installing Kubernetes cluster
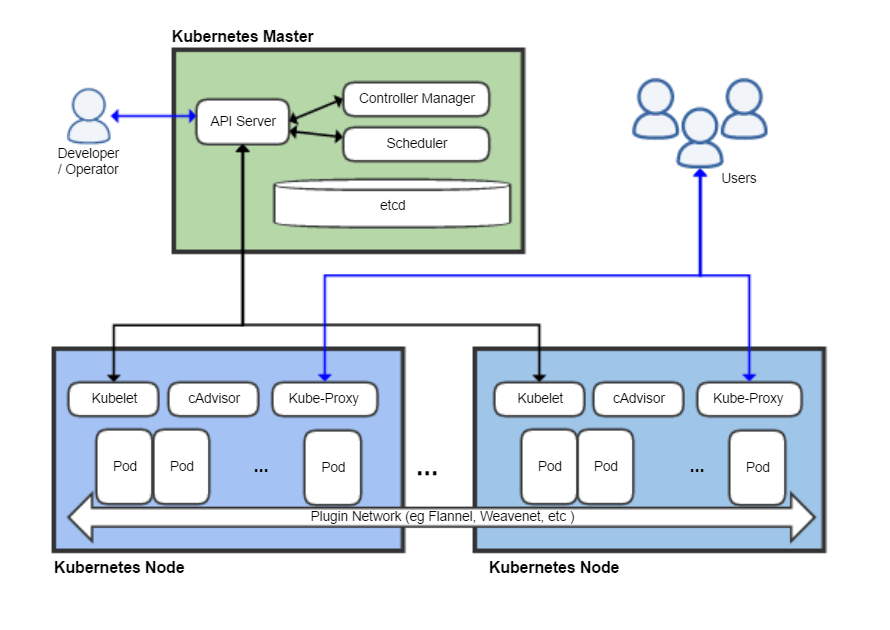
About a year and half ago, installing kubernetes was no easy task. But now you can install and configure kubernetes in 2-3 hours using the kubeadm tool. In our data-center, we use a combination of ansible and kubeadm to automate the installation on centos 7.4 vm. For your local development you can use minikube or KOPS. On public cloud like AWS and GCP you can create a cluster very quickly using corresponding console. Once installed you will have a cluster with the architecture shown below.
Installing Kubernetes CLI
For practical reasons you will manage your cluster and applications from your computer with a tool named kubectl. Once you have installed your cluster, you need to download this kubernetes CLI ( command line interface ) tool and configure it. Downloads are available from here. You then configure the CLI using a detailed how-to guide is available at here. Once completed it should look something like...
gururaghupathy@mymac ~/.kube $ ls -la config
-rw-------  1 gururaghupathy  staff  4842 28 Jul 15:45 config
gururaghupathy@mymac ~/.kube $
Deploying your applications
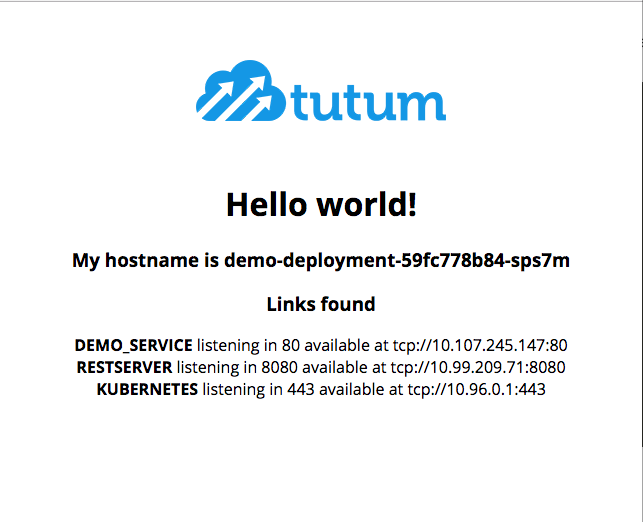
Once you have a running cluster and a configured kubectl CLI, you'll be ready to deploy and manage your application. You can do this using yaml file called as manifests. For demo purposes, we will deploy an hello world application based on tutum/hello-world image using the CLI command kubectl create -f demo.yaml. The content of demo.yaml is as follows...
apiVersion: apps/v1
kind: Deployment
metadata:
  labels:
    app: demo
  name: demo-deployment
  namespace: default
spec:
  replicas: 1
  selector:
    matchLabels:
      app: demo
  template:
    metadata:
      labels:
        app: demo
    spec:
      containers:
      - name: demo-containter
        image: tutum/hello-world
        imagePullPolicy: Always
---
apiVersion: v1
kind: Service
metadata:
  labels:
    app: demo
  name: demo-service
  namespace: default
spec:
  type: NodePort
  ports:
  - name: webport
    port: 80
    targetPort: 80
    nodePort: 31111
  selector:
    app: demo
Scaling up applications
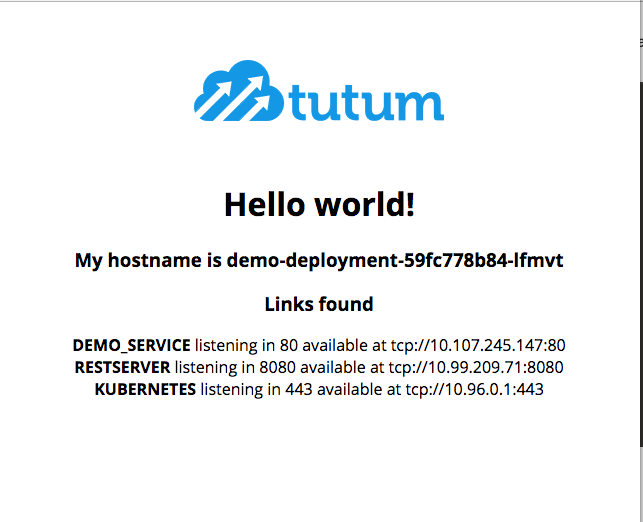
After executing the command kubectl get deployment, you can see below that we have one instance of the application running. Lets scale this application to two instances. Sounds complicated right? Actually it's very simple. Execute the command kubectl scale deployments/demo-deployment --replicas=2. Once this is executed, execute the command kubectl get deployments as shown below. From the output below we can see that we have 2 instances. Lets confirm the same using the browser. Refresh the browser at least two times. You will see two unique values.
gururaghupathy@mymac ~/git/Kuber/default/demo (dev) (dev) $ kubectl get deployment
NAME                          DESIRED   CURRENT   UP-TO-DATE   AVAILABLE   AGE
demo-deployment               1         1         1            1           49m
gururaghupathy@mymac ~/git/Kuber/default/demo (dev) (dev) $ kubectl scale deployments/demo-deployment --replicas=2
deployment.extensions "demo-deployment" scaled
gururaghupathy@mymac ~/git/Kuber/default/demo (dev) (dev) $ kubectl get deployments
NAME                          DESIRED   CURRENT   UP-TO-DATE   AVAILABLE   AGE
demo-deployment               2         2         2            2           1h
To summarize...
Once you have a running cluster and a configured CLI, it is really very easy to Deploy / Scale / Manage docker based application. In forthcoming posts we will demo how to monitor / view logs / metrics dashboard using grafana and influxdb. Please contact us if you need our expertice in managing Docker based applications using Kubernetes. We will create a simple but effective CI / CD pipelines for you, enabling you to deploy your applications with ease and on-demand. Happy deployment using kubectl and Kubernetes, the professional way.